Working with foam board for art projects; cutting, painting, etc
Published by Manning on September 7th, 2015
I use foam board (aka foam core) in almost all my big projects — masks, Halloween decorations, etc — and I’ve learned a lot of techniques that help make working with it a lot easier.
First, check out my article about buying cheap foam board in bulk. I’ve found that the cheap stuff is much easier to work with, and it’s less than half the price of the good stuff you’d buy in an art store!
Cutting foam board
Of course for any project involving foam board, you’ll need to cut it into different shapes. It can be challenging to cut foam board into very precise, smooth, complex shapes, but I’ve learned some tricks that really help.
(Note: be extremely careful when cutting foam board! Always take your time, and never cut toward yourself. Foam board can be unevenly dense inside and the blade can jump a bit sometimes. If you’re a kid, get a grown-up to do the cutting for you; if someone’s gonna get sliced open, let it be them!)
First of all, a brand new blade for your X-acto knife is key. I try to be cost-efficient with all my projects, but one thing I’ve learned is that it’s worth the money to change your X-acto blade often. I used to use a blade for way too long, and my foam board shapes would come out really ragged and ugly. So change blades often and you’ll have way better success. Buy a set of five or ten blades and change them often. As soon as you feel like you’re having trouble getting a perfect line, change blades.
Put down at least two layers of foam board to protect your work area. I use any old scraps of foam board I have lying around for this. You can also use cardboard, but the corrugated lines in cardboard can cause your blade to veer away from the line you’re trying to cut.
Whenever you’re cutting foam board, always make sure your blade is going all the way through the whole thickness of the board. You don’t want to cut your shape and then find you can’t punch it out because a lot of little areas are still attached in the back. This is why those two layers of protection are important. Ideally you want your blade to go all the way through the piece you’re cutting and well into the first protective layer.
When cutting, it’s important to keep your blade straight up and down. If you hold the blade somewhat like you’d hold a pen, the line you’re cutting will have a diagonal edge. For most projects, you’ll be better off with a perfect 90-degree edge. It’s harder to achieve this, but it’s worth the extra effort. The main way I do this is to lay down on the floor and get my head down eye-level with the X-acto knife. That way you can make sure you’re poking the the X-acto knife into the surface perfectly vertical, and you can keep an eye on it as you cut, making sure it stays that way.
Another way to achieve this is to position yourself directly over top of the X-acto knife, so you can see that you’re looking straight down the knife. I do most of this work on the floor and end up getting myself into all sorts of weird yoga poses trying to get the perfect angle.
Again, never cut toward yourself. I try to cut slightly toward myself so I can see what I’m doing but in a diagonal line off to the side, away from me and most importantly away from the hand that’s holding the foam board in place.
Getting a near-perfect 90-degree edge to the shapes you’re cutting is really helpful for a ton of reasons. If you’re going to be building a complex three-dimensional shape with your foam board pieces, a 90-degree angle will help the edges line up nicely and help them be nice and strong when they’re taped or glued together. If you’re cutting multiple pieces of the same shape, the 90-degree edges will help all the pieces be the same size all the way around.
Of course, you may have a need for a diagonal edge on a shape you’re cutting, and this is easy to achieve by holding the X-acto knife like a pen. In my experience the 90-degree edge has been much more advantageous for all my projects.
If you’re careful to cut precise shapes with nice 90-degree edges on all your pieces, you’ll be able to construct surprisingly strong shapes with just foam board and packing tape. It’s a really satisfying feeling when you put all your pieces together and they form a nice sturdy shape.
Paper maché and foam board
I’ve learned some really valuable lessons from working with paper maché and foam board! For most of my projects, the foam board serves as an interior base along with other materials, and the paper maché doesn’t go directly on it. But for a few recent projects I’ve needed to apply layers of paper maché directly to large, flat foam board surfaces, and it turns out this makes the foam board warp! This can be a huge problem if you’re not expecting it, and if you need nice flat surfaces in your finished project.
When you apply paper maché directly to a large area of foam board, it goes on nice and smooth, but then a day or so later when the paper maché is dry you’ll find that the foam board has warped and curled a bit. This is most noticeable if you only put paper maché on one side of the foam board; the paper maché shrinks a bit as it dries, and this causes the foam board to curl up a bit at the edges.
If you apply paper maché to both sides of a large area of foam board, the paper maché will try to shrink on both sides as it dries, and this causes some strange, irregular warping all over.
Another very strange thing that can happen is that the paper maché dries and the board warps and you find that the paper has lifted away from the foam board entirely, creating a tight, drum-like surface! This was a crazy surprise the first time it happened to one of my projects. Here’s what’s happening: Foam board is actually three layers; a thick layer of foam in the middle with a sheet of paper glued onto each side. The paper is what gives colored foam board its color, but even white foam board has white paper on both sides. So, it turns out paper maché sticks to this layer of paper better than the paper sticks to the foam in the middle. As the paper maché dries and shrinks, it sometimes peels the paper away from the foam entirely! So you end up with a very curved sheet of foam, covered in a slightly less curved surface made up of the paper covering and the paper maché glued tightly together. There’s actually a cushion of air in between the two.
Obviously this warping and curving are a problem for some projects. There are a few ways to fix this at least partially.
One is to weight down your projects with books and other things. When I’ve got a warped piece of foam board and paper maché, I’ll leave it under a huge stack of books for a few days, and this helps flatten it back out for the most part. I’ve found that leaving the foam board with the rounded side up is more effective than leaving it with the curled edges up. The more books you use, and the more days you leave them on there, the better. You might not achieve perfect flatness, but it’ll be much closer.
In more extreme cases, like when the paper lifts away from the foam and creates that drum-like surface, I’ve actually sliced open the dried paper maché with an X-acto knife, flattened the piece out under books for a couple days, and then reapplied some paper maché. You might get some warping with this second round of paper maché, but much less than the first time. The downside with this technique is that your paper maché surface might be less perfectly smooth since you’re paper maché-ing over those sliced paper edges. Still, better than having the thing totally warped.
Painting foam board
I use lots of spray paint and acrylic paint on my projects, and both work great on foam board. However, if you’re painting directly on foam board, too much paint can saturate the outer layer of paper and cause the edges to curl up and detach from the foam interior as it dries, so watch out for that. If you’re spray painting the foam board, you can avoid this problem by not applying the spray paint too heavily; start with a fine coat of spray paint, and then when that’s dry do a second fine coat, and even a third, and so on, allowing it to dry completely between coats, until you get complete coverage. If you apply too much paint at once, the outer layer of paper on the foam gets saturated, and as it dries, the paper shrinks but the foam inside doesn’t, and that cause the edges of the paper to curl and warp. The same goes for painting with a brush, with acrylic paint, tempera paint, etc. The thinner you apply the paint, the better. Schedule yourself enough time to paint in thin coats, let it dry completely, and then continue.
Note for anything involving spray paint and any type of foam (styrofoam, foam rubber, etc): make sure to do a small test first! Spray paint will eat right through some types of foam and basically melt or dissolve it. I found out the hard way when I tried to spray paint a styrofoam pumpkin black — the spray paint instantly melted right through the surface. Anyway, the types of foam board I’ve used can handle spray paint just fine, however, it’s still worth doing a test before you accidentally ruin your whole project!
Consider removing the paper coating
For smaller pieces of foam board, you may be able to peel off the paper coating entirely, leaving you with just a foam shape. This will be less prone to warping, but a bit harder to paint and harder to paper maché. The foam surface is less porous than paper, but you should be able to get things to stick pretty well with enough time and effort.
The removable paper coating on foam board can also cause problems if you’re trying to glue two pieces of foam board together. The coating may peel away from one or both sides and the pieces come apart. So in some cases you’re better off removing the layer of paper before gluing pieces together. Another technique to glue two pieces of foam board together with a really strong connection is to wrap the foam board pieces entirely in paper maché, let them dry, and then glue them together (or even paper maché them together). This way the foam is locked in from all sides and nothing can slip or peel apart.
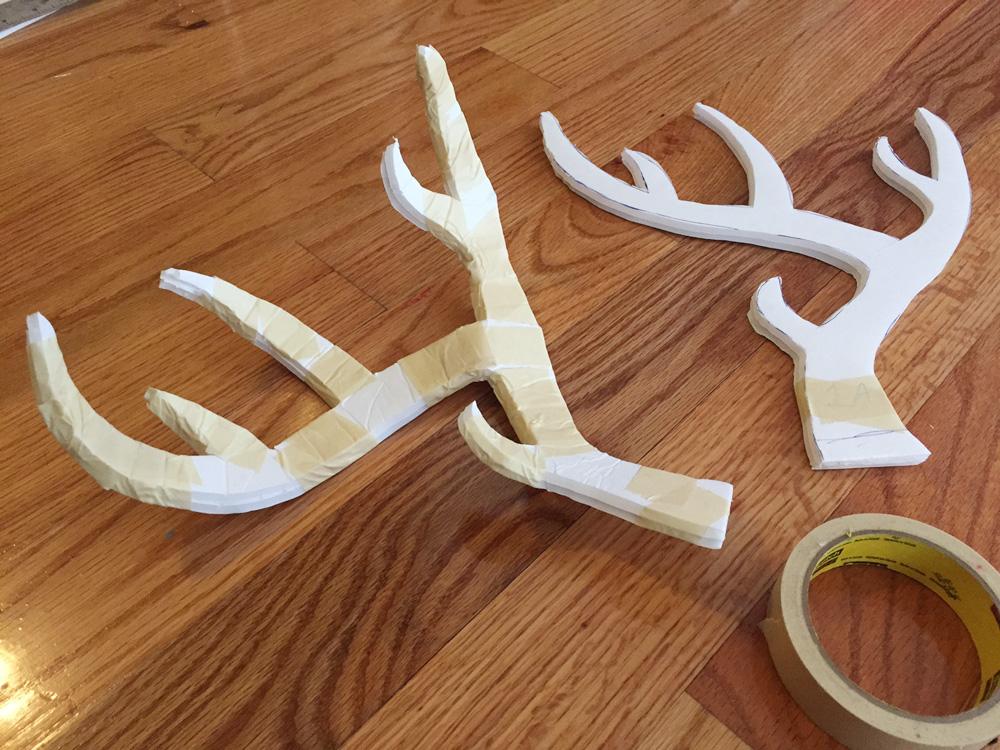
Creating curved shapes with foam board
It’s possible to create precise, strong, curved shapes with foam board using nothing but foam board and masking tape and then covering with paper maché. See my article about making foam board antlers for more info on this.
Wanna see some more things I’ve made with foam board? Light-up voodoo sign Foam board coffin Fake wooden signs Paper mache giant bat Morgue drawers Halloween decoration
Have fun!