All-in-One Motorcycle Handlebars Guide for a Perfect Experience
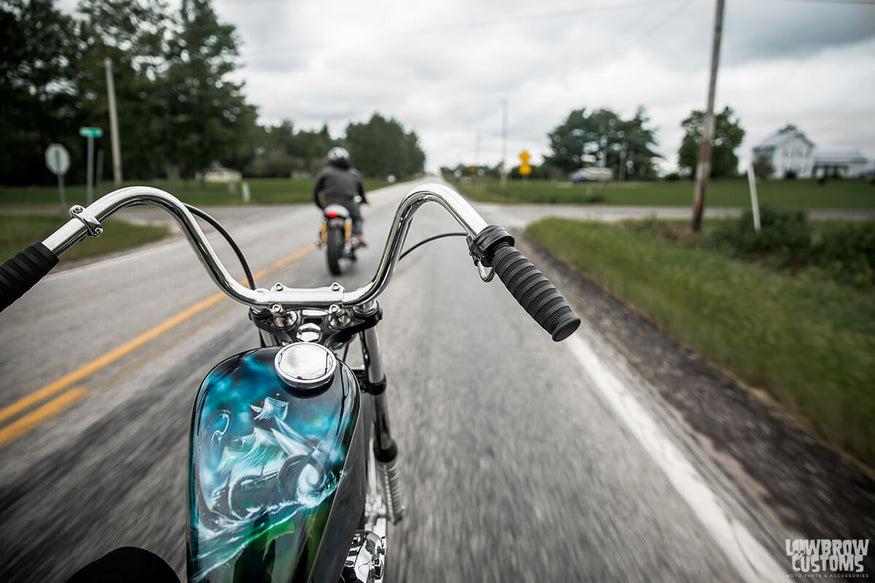
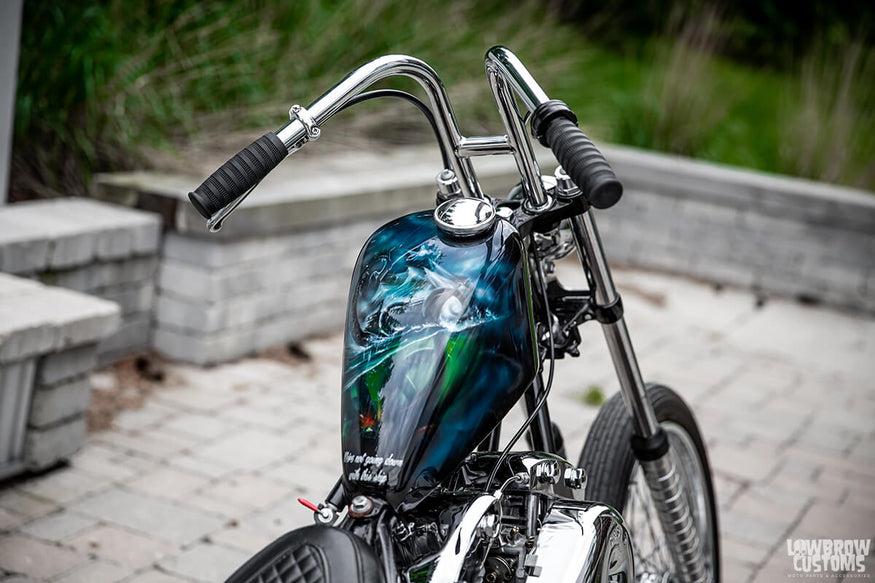
One of the most common changes you can make for your motorcycle is adding a set of custom motorcycle handlebars.
Getting the right set of motorcycle handlebars on your bike not only can improve the comfort of your ride, but it can also improve how well you can ride the bike.
The very first thing you want to do before tackling the motorcycle handlebar replacement process is to determine what you are trying to accomplish. Asking yourself some basic questions that will put you on the right path. Determining which set of motorcycle handlebars you need to fit the look and feel you are trying to obtain is a process.
There are quite a few things that need to be considered with this purchase. We will go over some of these details so you can get the perfect handlebars the first time around!
Motorcycle Handlebar Measurements
There are 6 main motorcycle handlebar measurements that are commonly referred to when determining the specs of a handlebar. It doesn’t matter if you are looking for a Harley Davidson® handlebar, or a handlebar for a Honda® Rebel®. All the measurements still apply.
The Diameter – Choose The Right One
The first one is the bar diameter. The most common handlebar diameter is 1”. Some older metric bikes have a handlebar diameter of 7/8”, but 1” bars are pretty much the standard after 1990.
There are thicker diameter handlebars on the market such as 1 1/4” handlebars, but keep in mind these handlebars usually have a 1” clamping area. This is so you can use risers made for 1” handlebars. They are only ¼” thicker outside of the clamping area and the motorcycle grip area.
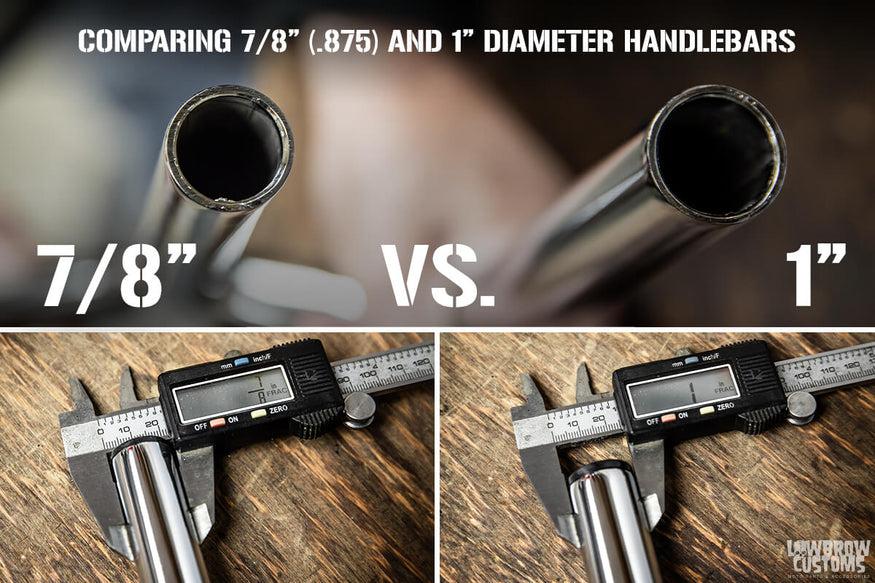 The most common handlebar sizes are 7/8″ (.875″) and 1″ handlebars. You can determine this visually when they are side-by-side. Alternatively, use a tape measure or a caliper to measure across the end of the tubing that makes up the handlebars.
The Width – Match Your Shoulders for a Comfortable Ride
Next measurement is width. This is the measurement of the total width of the handlebars at the widest point from end to end where the custom hand grips are installed.
It is good practice to choose a handlebar that closely matches your shoulder width for a comfortable ride.
The width of the handlebar may also depend on the style of motorcycle. A large, cruiser or vintage motorcycle may have much wider handlebars than a skinny chopper made for splitting lanes on the highway.
 Measuring the width of your handlebars is easy. Take a ruler and measure end to end. This Cycle Standard No. 10 Off Road Handlebar measures in at 34-1/2″ in width.
The Rise – Looking Cool vs Easy Handling
Rise is the next specification for a motorcycle handlebar. This is the most common measurement that is referred to when people are discussing motorcycle handlebars.
When you hear someone say, “I’ve 16” Ape Hangers on my bike”, they are referring to the rise of the handlebars.
This is the measurement from the bottom of the handlebar to the top where your hands grip the bars.
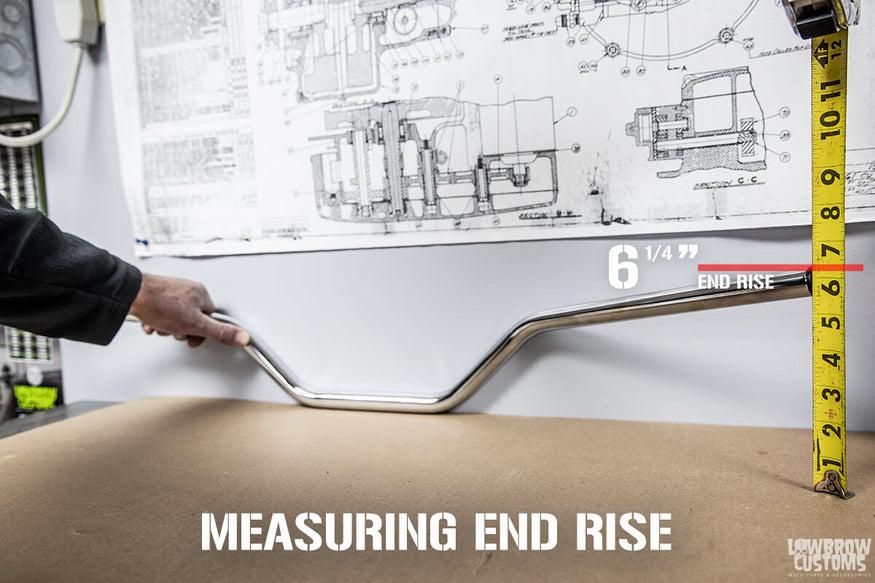 The easiest way to measure the rise of a handle bar is set it on a flat surface against a wall and from the bottom up measure the end of the handlebar. This Cycle Standard No. 10 Off Road Handlebar is measuring 6-1/4″ in end rise.
Center Width – Not All Bikes Are The Same
Center Width is the next measurement. This is the measurement at the bottom of the bar where it clamps into the handlebar risers, before the bends start.
This is an important measurement because some models with fairings can only accommodate a certain bar width.
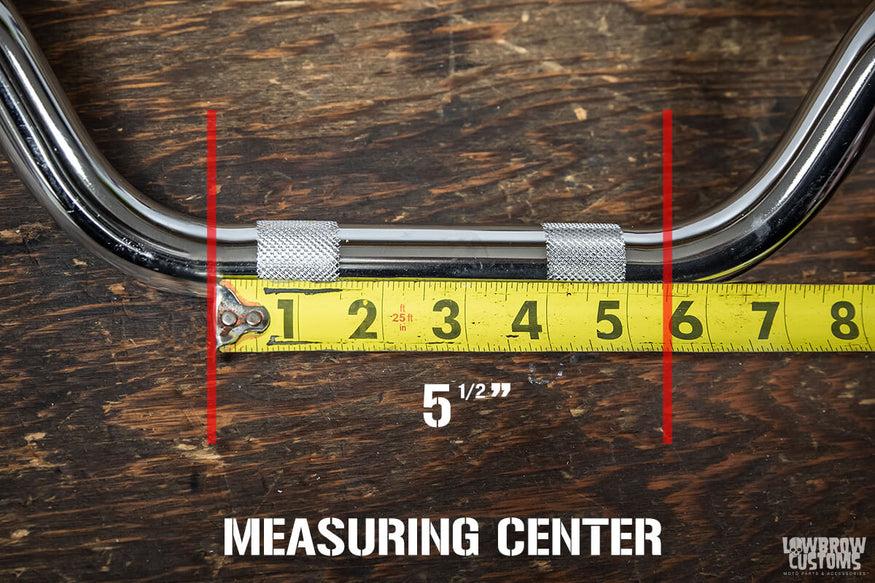 This Lowbrow Customs Super 4 Handlebar has a center of 5-1/2″
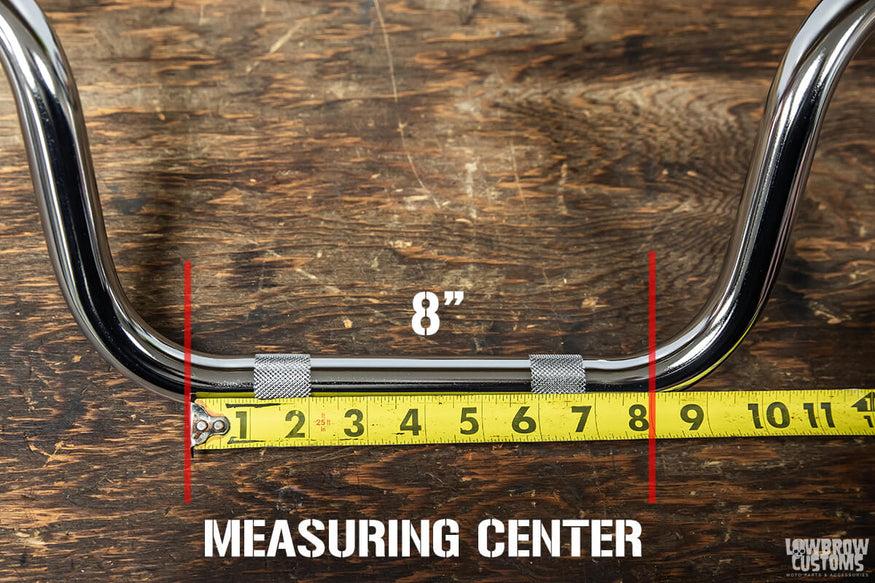 This Lowbrow Customs Mini Ape Hanger Springer style handlebar has a center width of 8″. Handlebars meant for springer front ends need a larger center width, as springer risers are 4-3/4″ center-to-center, versus the standard Harley 3-1/2″ centers found on most front ends.
The Pullback – Who Said Bikers Can’t Be Short?
The final measurement to consider is pullback. Imagine a straight line across the front of your handlebars. Now measure from that line to the tip of the handlebar. This is the pullback.
This measurement is important for many riders especially those who are a bit shorter in stature.
 The easiest way to measure pull back is by sticking your handlebars on a flat surface against a wall and measure from the wall to the end of the handlebar. This Cycle Standard No. 10 Off Road Handlebar is measuring 6″ of pull back.
The Riser Spacing Width – Last But Not Least
Other motorcycle handlebar measurements to consider are riser spacing width. This is the measurement where the bars clamp onto the motorcycle. The standard is 3 ½” for most Harley® models, and may other makes of motorcycles as well. This excludes Springer front ends, which use a 4-½” center-to-center spacing on the handlebar risers.
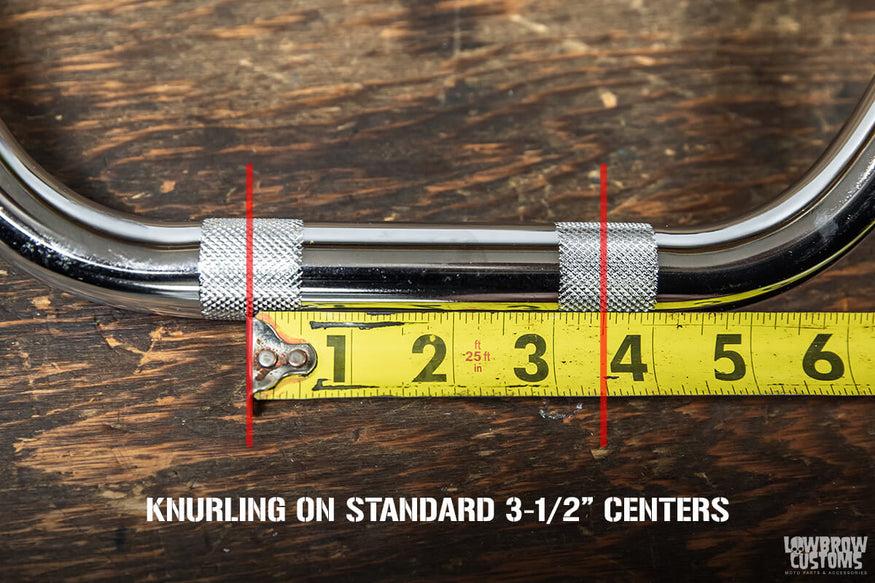 This Lowbrow Customs Super 4 Handlebar has knurling on 3-1/2″ centers. This matches the stock center-to-center riser dimension for use on Harley-Davidsons and many other bikes. The risers securely clamp directly onto the knurled part of the handlebars.
 This Lowbrow Customs Mini Ape Hanger Springer Style handlebar has knurling on 4-3/4″ centers. Springer front ends have wider riser spacing, and this allows the risers to securely clamp the Springer style handlebars directly on the knurling.
How to Measure Your Handlebars
These are all the measurements you need if you would like to get a set of handlebars that are similar
- The first step is to measure from the bottom of the bar to the highest point on the handlebar. This is your Rise.
- Next, measure from the tip of the handlebar end to the opposite tip of the handlebar end. This is your bar width.
- For the pullback, measure from the tip of your grip to the front the handlebar.
- Next is the center width, which is the inside bar edge to the inside bar edge.
- Finally, you have the riser width, which is the center of your clamping area on the right to the center of the clamping area on the left.
 Brent Maggard’s Knucklehead is a great example of having to measure for the right length cables as this is a totally custom handlebar setup. Photo by Ryan Loughridge.
Other Handlebar Terms You Need to Know
There are a few more handlebar terms that we covered in this motorcycle handlebar guide that you need to know when looking for a set of handlebars.
- Throttle-by-wire or Fly-by-wire refers to the throttle operation on select Harley Davidson® models. These bikes require a set of notches cut in the throttle side of the handlebar that holds a part of the throttle sleeve allowing for electronic operation of the throttle. Sounds complex, but it’s really not. If you have a throttle-by-wire bike, you need those notches.
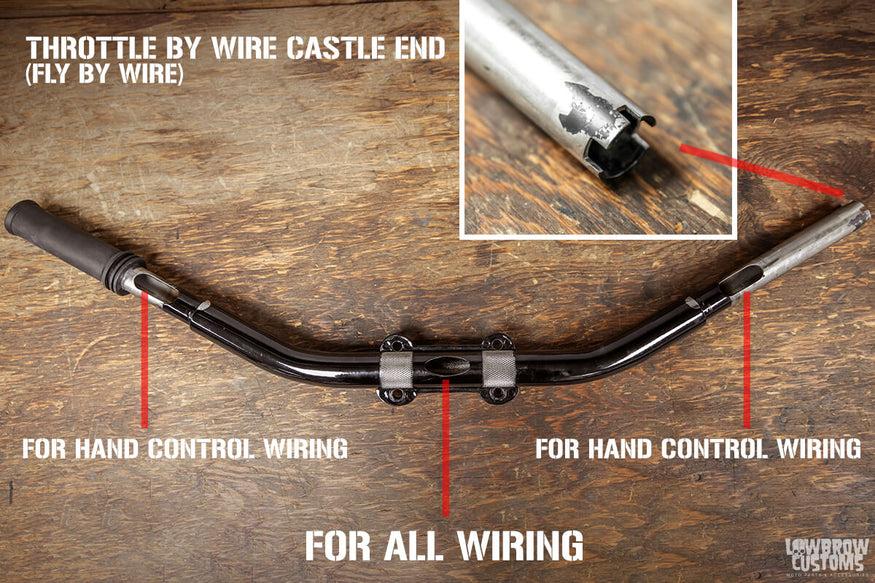 Here is a stock Harley-Davidson Dyna Throttle By Wire handlebar’s underside so you can see what the different parts look like compared to some smooth or dimpled bars.
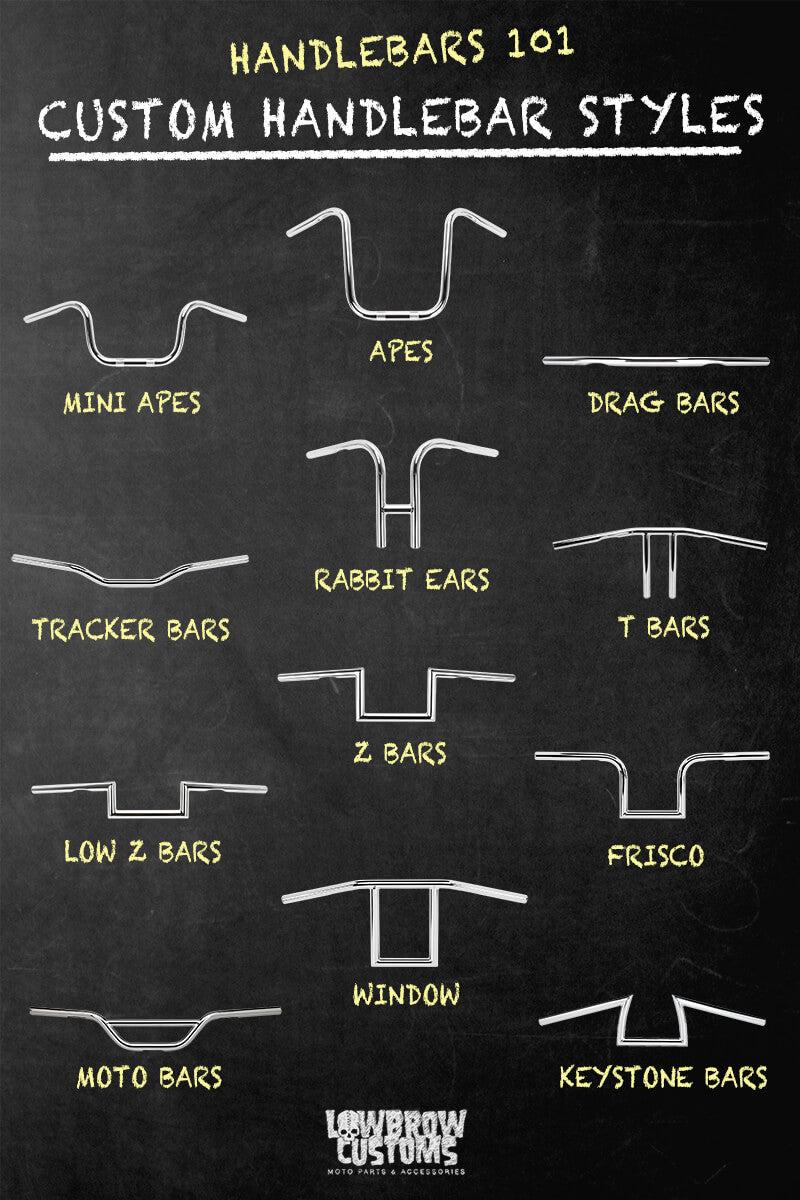
- Knurled bars. This refers to a manufacturing process, typically conducted on a lathe, whereby a pattern of straight, angled or crossed lines is rolled into the material. This process is applied to the area where the handlebars clamp to the risers providing a strong non-slipping surface.
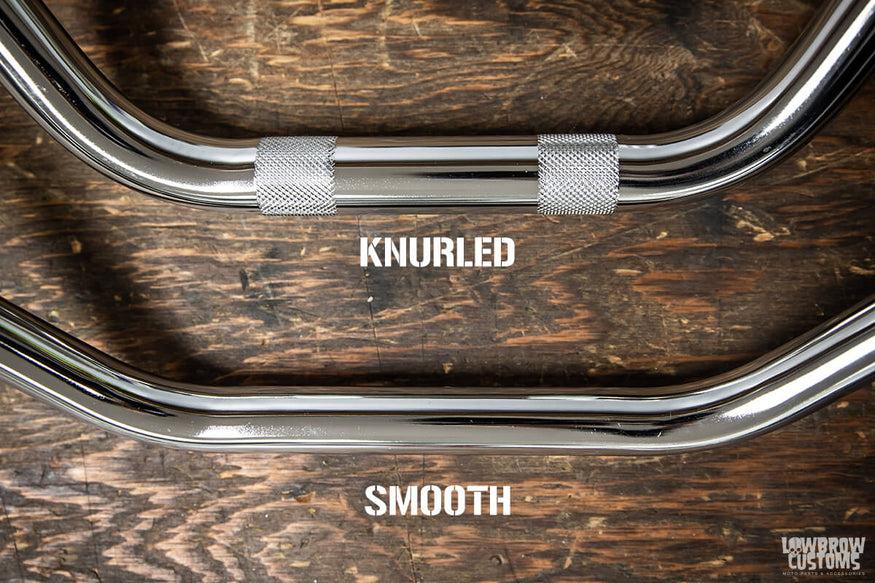 You can see the difference here when it comes to Knurled and Smooth bars in the center for risers.
- Dimpled handlebars refer to a process where a dimple is pressed into the handlebars next to the grip area. These dimples allow for a recess for the wires needed on certain Harley Davidson® motorcycles.
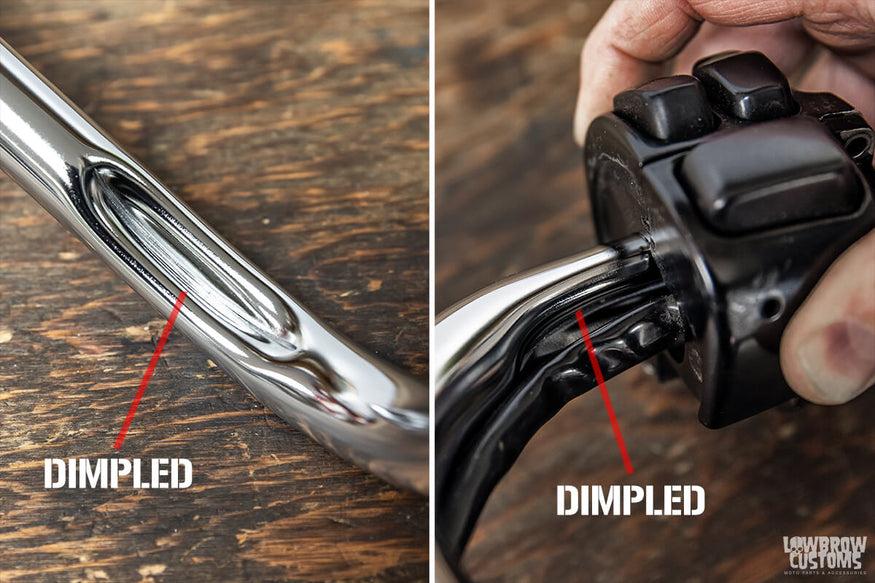 You can see on this photo the dimple and why it is there with the image on the right. The dimple gives enough room for the hand control wiring to go under a clamp for the brake caliper / lever and the clamp for the clutch lever.
- Drilled handlebars have holes drilled in them so you can install the wiring inside the handlebar. This is something custom builders do to keep the handlebar area of the bike looking clean and neat.
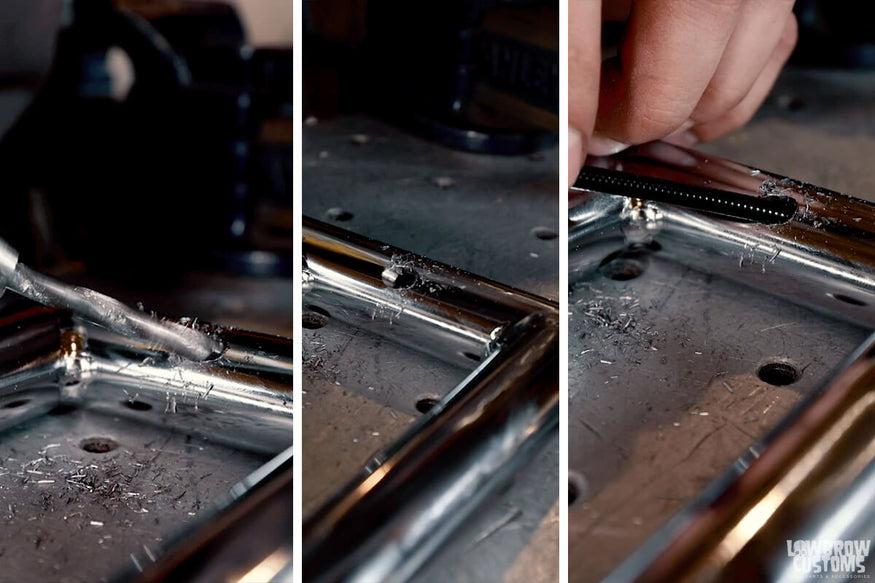 Drilling holes to insert throttle cables and run an internal throttle is a super custom and cool way to clean up your handlebars.
 Lowbrow Customs Rabbit Ear Handlebars are a popular choice; even for the Easter Bunny.
How to Measure Your Handlebars in 5 Easy Steps
- First step is to measure from the bottom of the bar to the highest point on the handlebar. This is your rise.
- Next measure from the tip of the handlebar end to the opposite tip of the handlebar end. This is your bar width.
- For the pullback, measure from the tip of your grip to the front the handlebar.
- Next is the center width, which is the inside bar edge to the inside bar edge.
- Finally, you have the riser width, which is the center of your clamping area on the right to the center of the clamping area on the left.
These are all the motorcycle handlebar measurements you need if you would like to get a set of handlebars that are similar
What are the Different Types of Motorcycle Handlebars?
Motorcycle handlebars come in a variety of shapes and sizes. They all perform the same function, but don’t fool yourself into thinking they all do the job the same way.
This chart shows some different styles of popular custom motorcycle handlebars. Most names and styles have been around for many decades.
The primary function of your handlebars is to allow the rider to control the motorcycle. The question comes down to how you want the bike to look and how much control you want to maintain. If you question this approach, just give me a second to explain this perspective.
Great Handlebars for Maintaining Control
First, let’s take a look at a dirt bike. Here is a motorcycle that is built to ride over jumps and obstacles at speed. You need to maintain a high level of control on a dirt bike. The closest thing to a dirt bike handlebar in the street world would be a drag bar or a tracker bar.
- Drag handlebars are basically a flat handlebar with zero rise and a slight amount of pullback.
- Tracker bars arevery similar to the handlebar you would find on a dirt bike. It has a slight rise and pullback and offers a lot of control. This is why it is called a tracker bar because it is modeled off of the bars used on dirt track racers.
If you are looking for a motorcycle handlebar types that will give you superior control of the motorcycle, a Drag bar or a tracker bar is a good choice.
 Tracker style bars are ideal for racing and give optimal control over the bike.
Handlebars for a Bad-Ass Look
Another type of handlebar that has always been popular is the Ape Hanger handlebar. This handlebar offers a cool look, but less control.
Some people will argue about this, but I have never seen a dirt bike race winner running Ape Hangers. I figure there is a reason for that.
The difference in control depends on the rise that you choose. An Ape Hanger handlebar with a 16” rise is going to offer a lot less control than a 10” rise Ape Hanger.
So, if you are looking to get some comfort without lacking too much control, then you can lower the amount of rise to get the perfect mix of both worlds.
Ape Hanger handlebars also come in a variety of widths. A Narrow Ape Hanger handlebar will have a 28” to 30” width but a standard Ape Hanger will be wider. Anywhere from 33” to 38” overall width.
 Lowbrow Customs 9″ Mini Apes are also really close to style called Buck Horns. They offer a great pull back with a classic look.
Handlebars For Outsiders
Other popular styles of handlebars include Buckhorn handlebars, Beach Bars, T-bars, Z-bars and Rabbit Ears. All of the handlebar names are a description of how the handlebar is bent.
- Buckhorn bars have a decent amount of rise, but then bends back toward the rider. The grip position is more vertical as opposed to the standard horizontal grip position.
- Beach bars are bent like the handlebars you would find on a beachcomber bicycle. Long and flat with the grips bending gradually toward the rider.
- T-bars and Z-bars are similar to drag bars, but they have some rise. The “T” and the “Z” refer to the design.
- Rabbit Ears are essentially a very narrow and stylized version of a Buckhorn handlebar. These bars resemble a set of rabbit ears, thus the name.
- Drilled handlebars have holes drilled in them so you can install the wiring inside the handlebar. This is something custom builders do to keep the handlebar area of the bike looking clean and neat. This could apply to most any style or design of motorcycle handlebar.
 One of Todd’s builds with short Z bars and Biltwell risers on a springer front end.
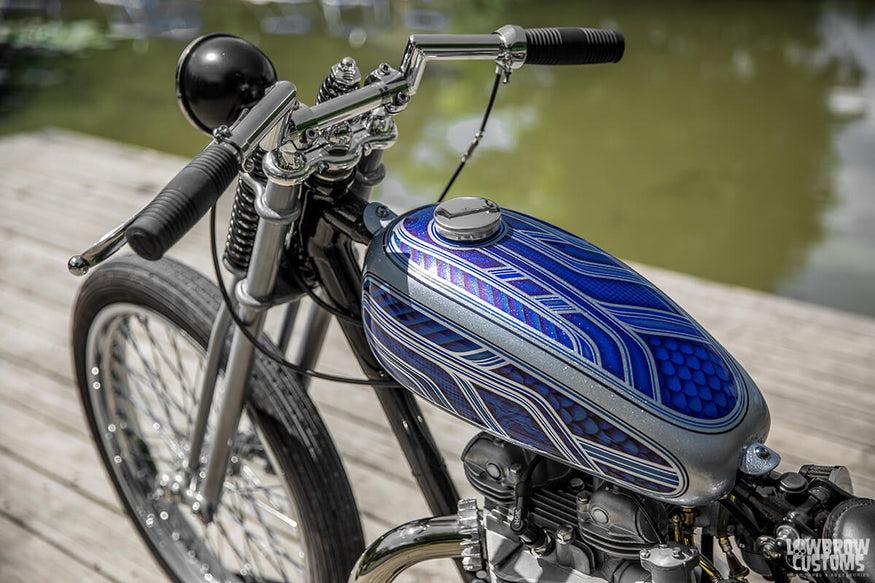
Finishes and Coatings of Motorcycle Handlebars
Motorcycle handlebars can be found in a variety of finishes. Most versions are offered in a chrome or gloss black painted versions. You will also find some bars are offered in a polished, anodized, or electroplated coatings Lowbrow Customs also carries some handlebars in stainless steel.
If you are looking to build something custom, you can always paint your handlebars to match the look you are trying to obtain.
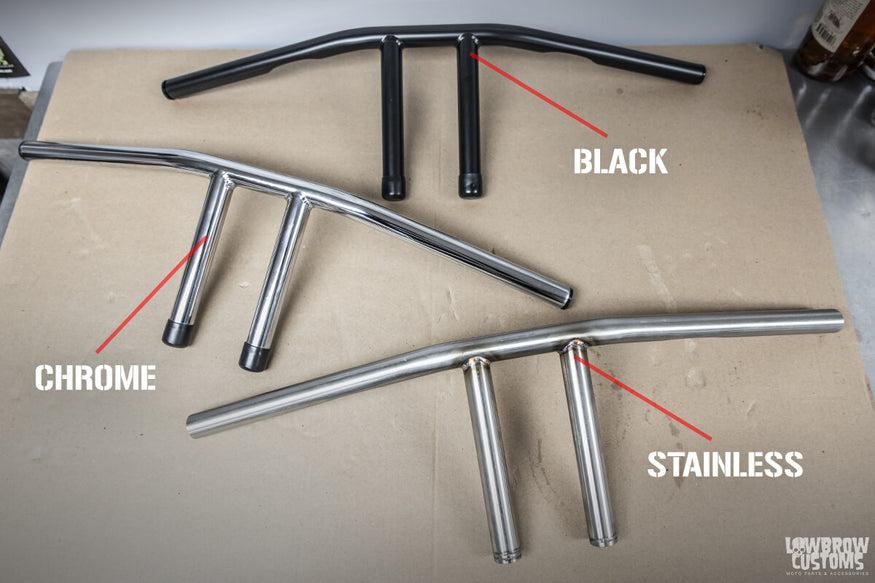 Look at the differences in the these 8″ Lowbrow Customs T-Bars. They come in Black, Chrome, and Stainless.
How to Choose the Right Handlebars?
Comfort or Style?
Ok, so now you know all the terms and it is time to answer the most important question. What is more important to you. Comfort or style?
For example; If you are looking to put a set of Ape Hangers on your bike, you might get the look you want, but you are giving up some control and comfort. Many people try to find a compromise.
If you want the Ape Hanger look but want to retain good control, you can install a Mini Ape Hanger. Mini Ape Hangers usually have an 8-to-10-inch rise instead of a 12-to-16-inch rise. These are great bars because they offer a good look and a decent amount of comfort and control. The other benefit is in most cases (not all) you will not need to change out your cables. This also tends to mean that these are some of the best motorcycle handlebars for touring as they will not be overly tall, offering better control and handling.
 Lowbrow Customs Rabbit Ears have a great pull back, an extremely comfortable riding position, and amazing handling.
Matching the Size With Your Style of Riding
The best process is to sit on your bike and get an idea of where you want your hands to be when riding. This should give you an idea of what you are looking for. Have a buddy take some measurements that get you in the ballpark. If you like the comfort of your existing handlebars, and just want to change the style, you can take some measurements to help you get an idea of what you are looking for.
 These Lowbrow Customs stainless 8″ T-Bars on Tim Fiorucci’s Ironhead give off that custom look, aggressive stance, and a perfect fit for this machine.
From there you can pick a style that fits your criteria and avoid the work of installing a set of bars you don’t like. The staff at Lowbrow Customs are here to help, so if you have any questions after you read our motorcycle handlebar guide, reach out to us.
We have installed a ton of handlebars in our time and we can help you avoid some of the mistakes we have made in the past. We will do everything we can to help you get the perfect set of handlebars the first time.
Handlebar Guide Final Considerations
There are still a few final considerations of the handlebar guide 101 that you need to determine that may affect your decision.
For example, if you want to wire the handlebars internally, you should consider buying pre-drilled handlebars.
If you have controls that need dimples, you should consider buying dimpled bars or you may need to change your controls.
If you decide you want to extend your bars, you need to determine if you will have to extend or replace your brake lines and your cables.
This may be required even if your new handlebars have a reasonable amount of rise. It all depends on the rise, pullback and overall cable length needed.
 The right bar can make all the difference in the world and not only help your bike stand out but handle like a dream. This Mini Apes with a stock riser set up on Kelly Messia’s slab-side is a perfect fit! photo by: Ryan Loughridge
How to Install Your New Motorcycle Handlebars
Once you have your new handlebars picked out, it’s time to install them. There are some videos on Lowbrow Customs that can really give you some details. Here we will go over some of the basics.
TIPS: The very first thing you want to do is put a towel over your tank. When you start to loosen things up, your bars can fall back on your tank, or you can drop a control on it. The towel will help protect your tank from damage. Don’t skip this step or you may regret it!
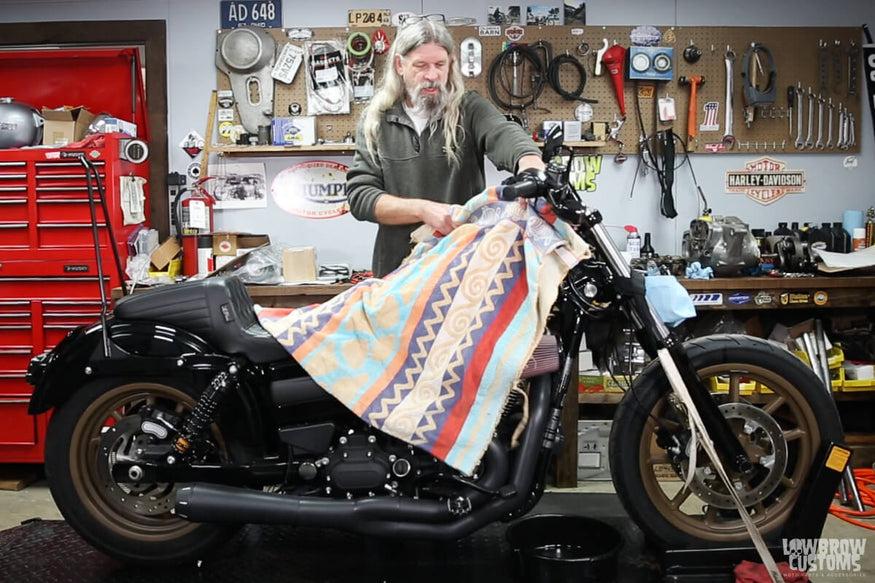 Put a blanket or towel over top of your gas tank that way if anything falls accidentally on it nothing gets dinged or scratched when changing your handlebars.
Step 1: Remove Your Grips
First step is to remove your grips. Billet grips usually small Allen set screws you will have to loosen. Keep in mind your throttle side might be easier to remove by loosening the control screws, detaching your throttle cable (or cables) and sliding off your throttle tube with the grip still on it.
Rubber handlebar grips can often be removed with the aid of some compressed air. Using an air blow-off tool, slip the nozzle under the edge of the grip and apply compressed air as you pull the grip off.
If the grips have been glued on or are otherwise just not coming off, you can slit through them with a razor blade and install new grips along with the new handlebars.
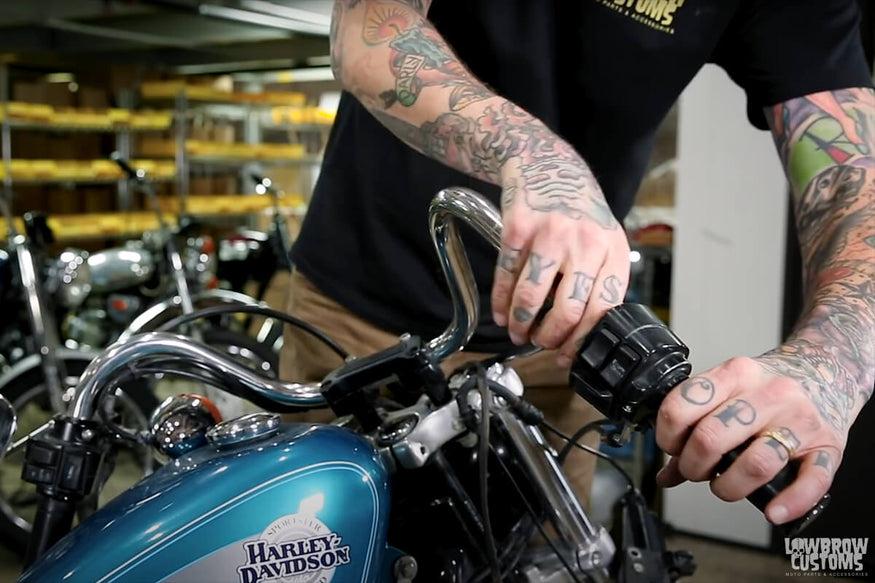 Removing grips and controls is the first step toward changing out those old handlebars.
Once the grips are off you need to take off the mirrors, blinkers, and finally the controls. When you loosen the screws that hold the controls on, check and see if you can slide them off the bars.
If the cables or wiring attached is not long enough to allow you to slide the control housing off the bar, just leave it on for now.
When we loosen the riser bolts you will be able to slide the handlebar over to give you more slack to slide the control off.
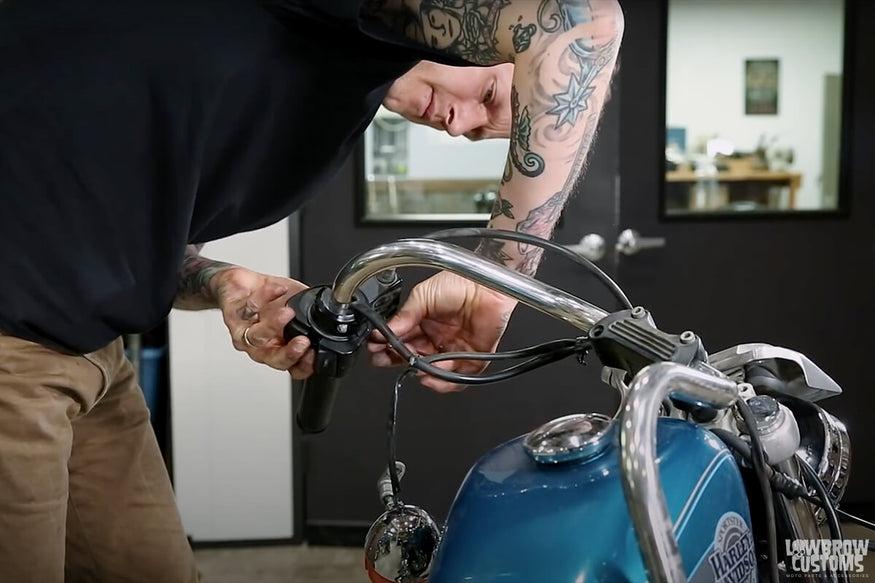 Remove the hand controls on both sides, both clutch and brake.
Step 2: Loosen the Risers
The next step is to loosen the risers. If your risers bolt from the bottom, it is good practice to break those nuts loose first. This way you can use the bars as leverage.
Now gotto the top of the riser and remove the top riser clamps. Keep in mind this is the point where the bars can come down and hit the tank. Slowly loosen the riser while being careful to support the bar.
Now that the top clamps are off you can slide the bars over and remove the controls, if needed, and set them aside.
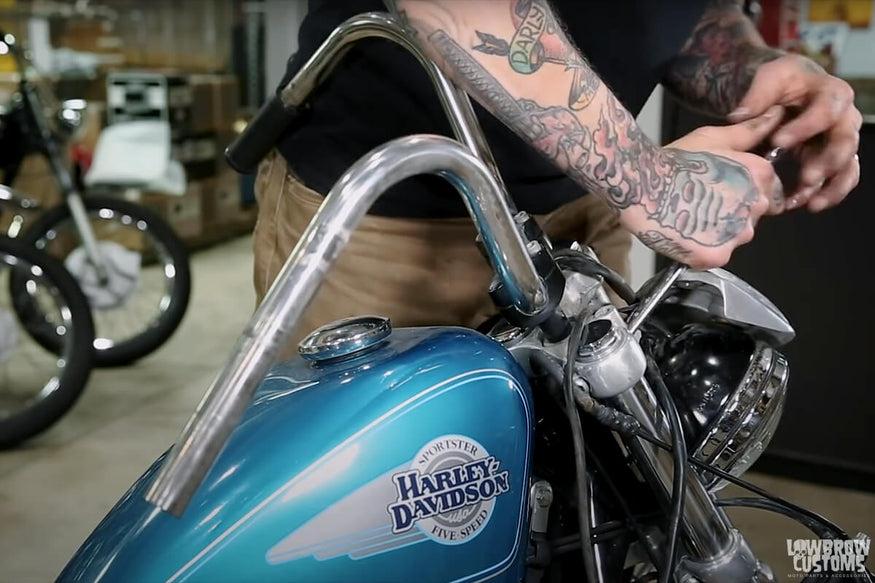 Pro tip, loosen the bolts holding the risers on before removing the handlebars from the risers. This will give you enough leverage to loosen them easily.
Step 3: Install the New Bar in Reverse Process
To install the new bars, you just need to reverse the process. Start with the risers and work your way up the bars.
Make sure you check your cables and your bars by rotating the bars from stop-to-stop to ensure there is enough cable slack and bar clearance. Your cables and wires should have some slack in them and your bars should clear your tank.
Make sure you did not pinch any wires, and that your front brake light switch is operating properly.
If you have questions in reading our motorcycle handlebar guide, take a look at one of the handlebar installation videos, or just contact us with your question. We are always happy to help.