By Matt Weber
It’s a drill press. Check out some modern features and DIY jigs.
Precision. Control. Productivity. Those are the traits that a drill press offers over a standard handheld drill. The primary advantage of a drill press is its accuracy and speed of repetition. You can adjust the depth stop of the spindle by positioning a locking nut against the stop, enabling the drill press to bore a perfectly vertical hole the exact same diameter and exact same depth over and over. With the right bit, a drill press can bore almost any dense, solid material from wood to masonry to metal even glass. A drill press is built around a vertical post attached to a heavy steel base-plate for stability. The drill head or “quill,” which contains the chuck, spindle and bit, is simply plunged down into the work piece when the pinion levers are turned on the side of the machine.
A work-support table is mounted to the post, and the table can be raised, lowered and pivoted to bore holes at a wide range of angles in workpieces of many different sizes. Both standalone and bench-top versions are available, with the bench-top versions offering space-saving storage, while the stand alones offer greater capacity for larger workpieces, more power for tougher materials, and usually a wider range of operating speeds.
The motor of the drill press is connected to the spindle, chuck and bit via a drive-belt and pulleys that power the drilling action. The user can select different drilling speeds by moving a belt-tension lever that places the belt over different combinations of pulleys.
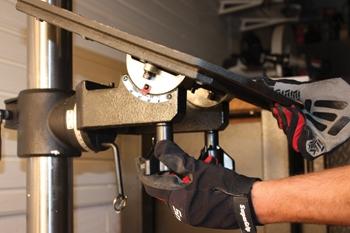
Size Matters
The size of a drill press is measured in terms of “swing,” which is defined as twice the throat distance (the distance from the center of the spindle to the closest edge of the column or post). For example, a 16-inch drill press will have an 8-inch throat distance. This means a 16-inch drill press would be capable of drilling a hole in the center of a 16-inch disk.
Drill presses generally range in size from 10 to 18 inches and are manufactured by Skil, Ryobi, Ridgid, Craftsman, Jet, Grizzly, Powermatic, Delta and others.
Modern Features
Different drill presses offer different features, and the Delta 18-inch Model 18-900L shown in this article demonstrates a variety of modern bells and whistles (www.deltamachinery.com). With this particular model, users can select from 16 spindle speeds that specifically suit different materials (softwood, hardwood, acrylic, brass, aluminum, steel) as well as different bits (twist bits, brad-points, Forstners, hole saws and spade bits). The unit’s instruction manual also contains a handy chart for matching drill speeds to the appropriate combination of bit and material. The Delta 18-900L also offers an auto-tensioning drive-belt system that allows fast and easy speed changes with consistent belt tension and motor alignment.
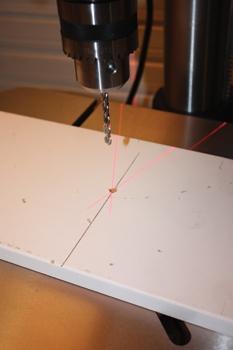
Another popular feature of today’s drill presses is the crosshair type of laser alignment that gives the user pinpoint accuracy for the drill bit. Twin laser beams are fully adjustable to project a bright red crosshair target on the workpiece at the point of contact.
Additionally, the Delta 18-900L’s flexible LED light illuminates the work surface for better visibility. This is a welcome amenity when working in dimly lit workshops or garages.
Specialty Bits
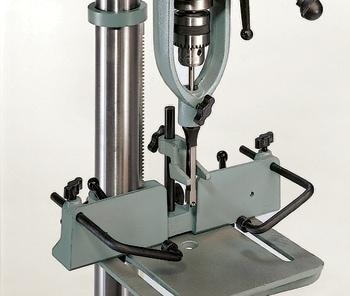
Beyond the standard action of drilling holes, drill presses also lend themselves to certain specialty operations such as cutting a mortise, which is a square or rectangular hole that receives a tenon, forming a strong woodworking joint. You can buy a special attachment for your drill press that allows you to drill the square holes. These specialty bits are basically a four-sided square chisel with a hole in the middle where a drill bit is inserted. As the bit penetrates the wood, the chisel forces the corners of wood around the drill bit into the spinning bit, which removes the material and pulls it out of the hole. The result is a square hole. The advantage of mortising with a drill press is that the user can often cut a mortise in a thicker board than can be cut with a typical dedicated mortising machine.
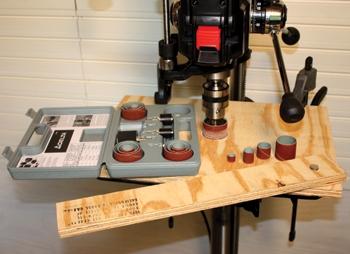
Another popular drill press application is drum sanding. When the chuck is equipped with a sanding drum and a matching sleeve, the drill press can be used to sand the edges of boards and panels for assembling furniture and cabinetry. The 25-piece sanding drum kit from Delta comes with five drums of various sizes with matching sanding sleeves with 80- and 120-grit abrasive.
Shop-made Jigs
To optimize your drill press for the easiest and most efficient operation, it often helps to build some simple jigs to facilitate the job. Here are some basic instructions to whip up some of these handy devices that help streamline the work:
Simple Straight-edge Fence. A straight-edge fence is a basic guide that mounts to the work-support table of a drill press. The workpiece can be moved against the fence in a straight line, enabling the user to drill repetitive, identical holes in the stock.
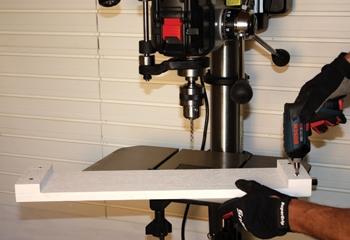
To make the fence, first select or rip-cut a very straight board that will guide the workpiece in a straight line. Measure the width your drill press’ work-support table. Cross-cut the board to that length plus 4 inches. Then, cut two 2-inch rectangular blocks to the same width as your fence board. Screw or glue these two blocks to the edges of the fence board so their outer edges are flush with the edges of the board. The blocks should overhang the edges of the work-support table, bracketing the fence tightly against the surface but allowing the fence to slide from front to back to accommodate different sizes of workpieces. To use, simply mark the line of the holes to be drilled on the workpiece, position the fence on the table with the workpiece flush against it so the drill bit is in line with the marked point of contact. Drill the first hole, then slide the workpiece along the fence as you progress with the succeeding holes.
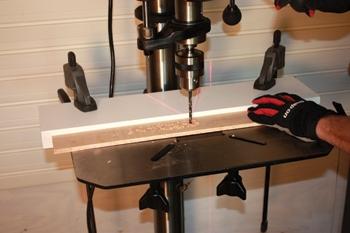
The fence shown in the photos was made from a 3/4-inch Fypon PVC board. This design works great for drilling material that sits flat on the work table, but for drilling the edges or ends of a workpiece when only a narrow edge of the stock sits on the table and the bulk of the material is upright, you can increase the height of the fence for better support. Simply stack one or more very straight boards onto the jig, fastening them flush with the guiding edge to give the workpiece greater vertical support.
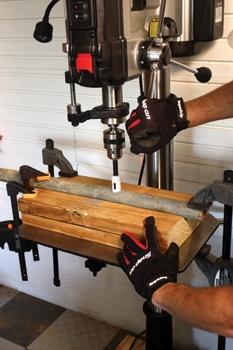
Pipe Jig. When drilling a cylindrical shape, such as a pipe, the job is easier when the workpiece is clamped on the table. The pipe jig uses a V-shaped notch to hold cylindrical objects steady to prevent rolling. The larger the V-notch, the larger the pipe it can support. I laminated together two 2-by-8’s cut to the same length, screwing them together face to face. The thickness of the stacked boards gives the jig extra strength to compensate for the material removed when the V is cut into the wood.
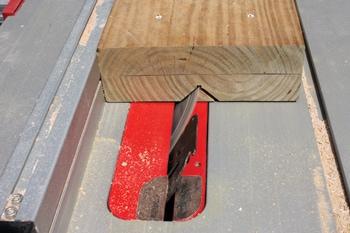
Set a table saw (or handheld circ saw with rip fence) so the blade is at a 45-degree angle. Use a square to align the top edge of the tilted blade with the center of the jig. Then, align the rip fence to hold the jig in position, and run the stacked blocks over the blade. Turn the blocks around and send the opposite end over the blade to complete the second side of the 90-degree V-notch. Your jig is now complete; just flip it over and clamp it to the work table to hold pipe when drilling.
Auxiliary Drum Sanding Table. A sanding drum in the chuck of a drill press cannot pass through the work table. This being the case, if you run a workpiece along the drum, the lower edge of the workpiece doesn’t get sanded. A drum sanding table enables you to sand the entire edge of the workpiece.
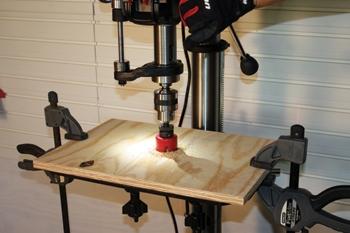
To assemble the sanding table, first measure the drill press table and cut a piece of plywood to the exact dimensions. Place the plywood on the table, aligning the edges and clamping in place. Use a hole-saw or Forstner bit in the drill press to bore a hole through the plywood table. I chose a hole saw with a slightly larger diameter than the largest of my sanding drums. In one of the front corners of the plywood table, about 2 inches from the edges, drill a 1/2-inch hole for a 1/2-inch dowel to fit. This is the pivot point for a moveable fence. To make the fence, cut a 2-inch strip of plywood to the same width as the plywood table. Align the fence flush with the edges of the table, and on one end drill a corresponding 1/2-inch hole for the dowel. Insert one end of the dowel into the fence and the other end into the plywood table.
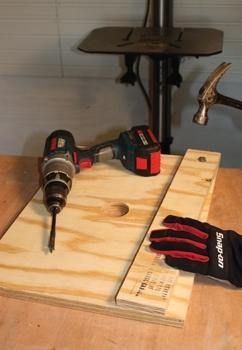
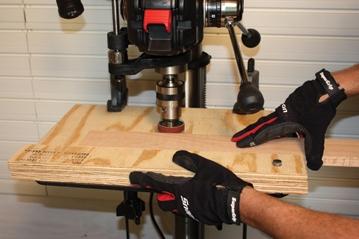
To use the jig, place the workpiece against the edge of the fence, pushing the fence so the workpiece makes contact with the sanding drum. Remove the workpiece, then move the fence slightly closer to the drum (about 1/32 inch) and clamp it in place. Start the drill press and push the workpiece between the fence and the drum to sand the edges.
With these commonly used jigs and the right bits for the job, a drill press can be a reliable workshop staple for woodworking, metalworking, handicrafts and more.
Side Note
Benchtop Drill Press
For DIY’ers who don’t need quite the capacity or have room for a large floor-mounted drill press, a 10” benchtop drill press can offer precise hole alignment at less cost. They offer many of the same features as the larger models, including depth control and angle adjustment. When bolted securely to a workbench, a benchtop unit can provide a versatile drilling and sanding station for your workshop or garage.

