The long-awaited basic pants pattern tutorial is finally here! It’ll be in good company with my other basic pattern tutorials. You can find them here.
This pattern will work as a starting point for all kinds of different women’s pants designs. My personal favorite is the palazzo pants.
The Measurements
As usual, let’s start from the measurements you’ll need to draft the basic pants pattern.
- Waist Circumference
- Hip Circumference
- Waist to Hip Length
- Crotch Depth
- Waist to Knee Length
- Waist to Ankle Length
Of these, the crotch depth is probably the most difficult one. If you get it wrong, your pants won’t fit right. Take the measurement sitting down on a chair. Keep your back straight. You should have an elastic tied around your waist so that you get the correct starting point for the measurement. Then measure between the waist and the chair seat.
Here are the measurements we’re going to be using in this example. They are for a CA 170cm tall person. The two horizontal measurements have already been divided in half.
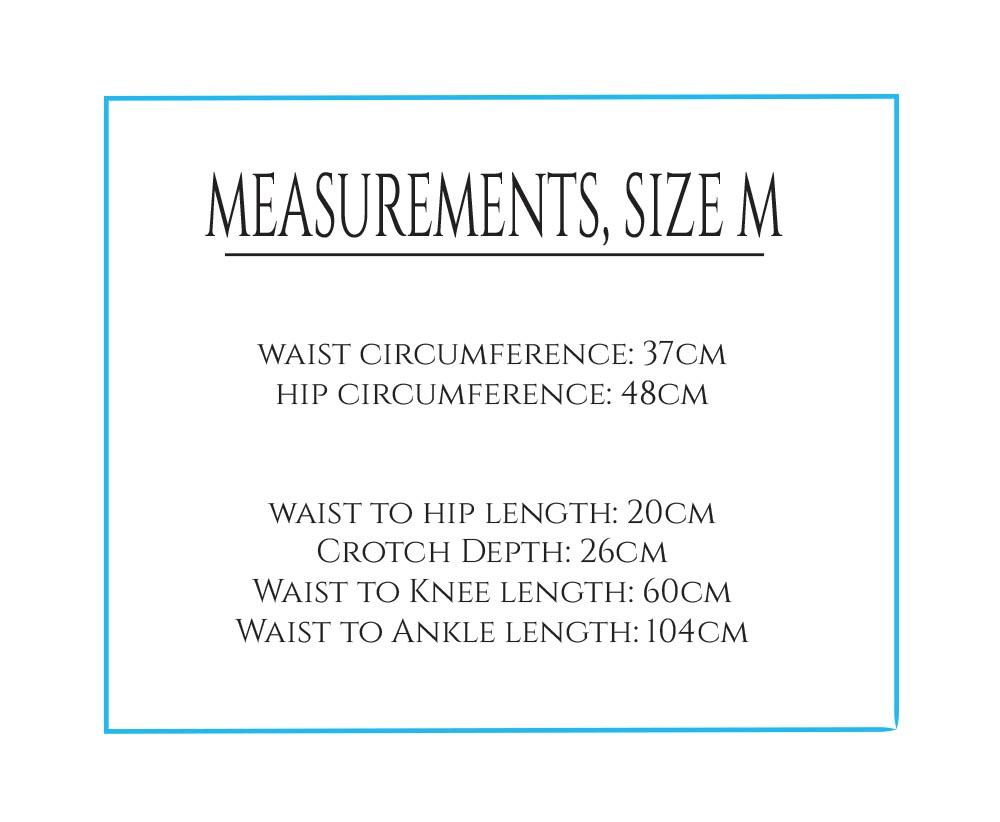
The Basic Pants Pattern
Now that you have the measurements, let’s start drafting!
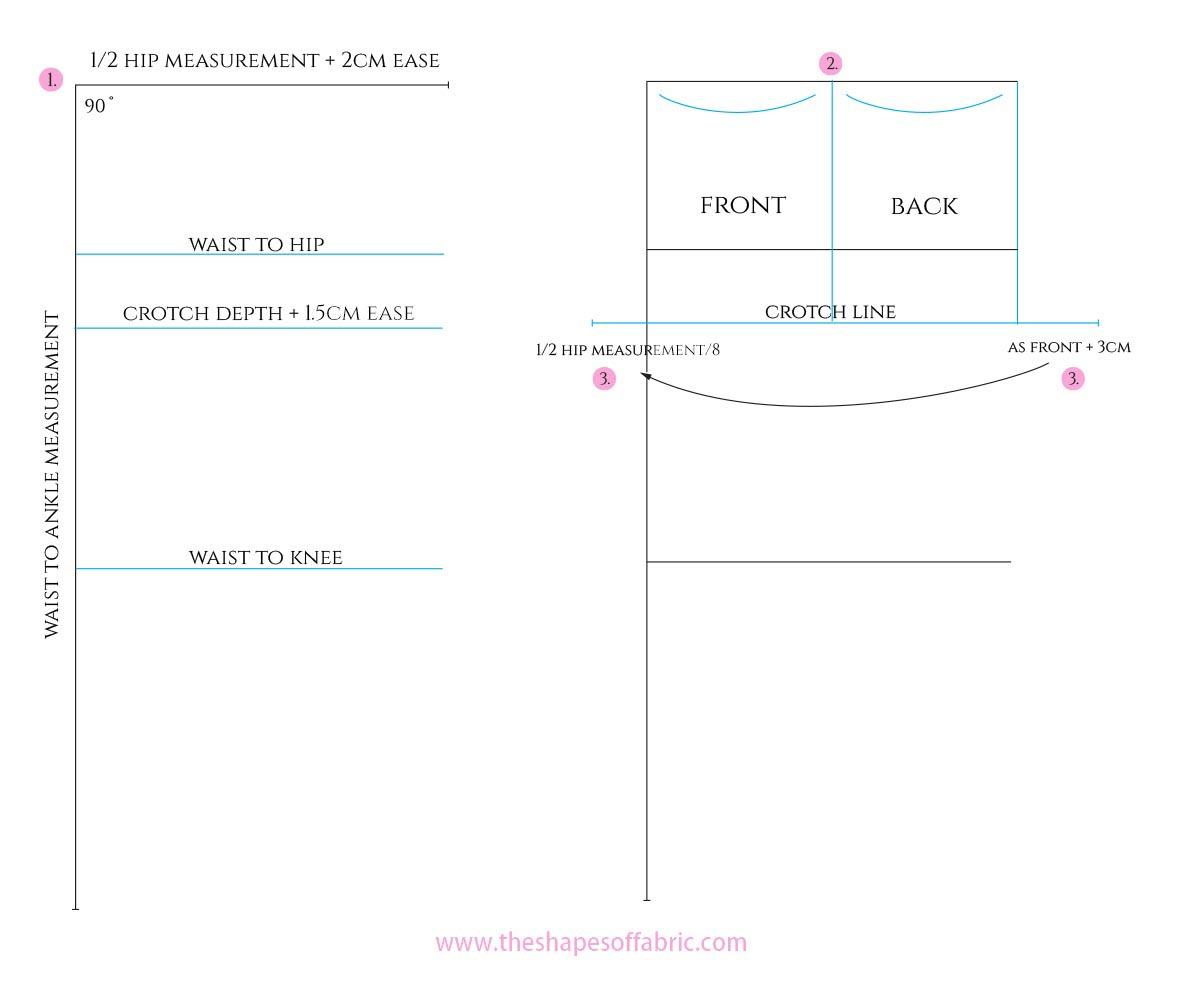
1. Draw a right-angle using your ½ hip measurement + 2cm of ease for the width, and waist to ankle measurement for the height.
In this example, the width is 50cm and the height 104cm.
Then add the other 3 measurements: waist to hip, crotch depth + 1.5cm of ease, and waist to knee.
Going in order: 20cm, 27.5cm, and 60cm.
2. Separate the front and the back pieces by dividing the total width in two as shown in the picture. Square down also at the upper left corner, going all the way to the crotch line.
3. To find out where the crotch points will be, starting from the front, calculate ½ hip measurement divided by 8 and extend the front crotch line to the left.
For example: 48cm /8 = 6cm.
Then use the same measurement and add 3cm. Extend the back crotch line to the right.
In this example: 6cm + 3cm = 9cm.
For more fitted pants, you can leave the back crotch line slightly shorter.
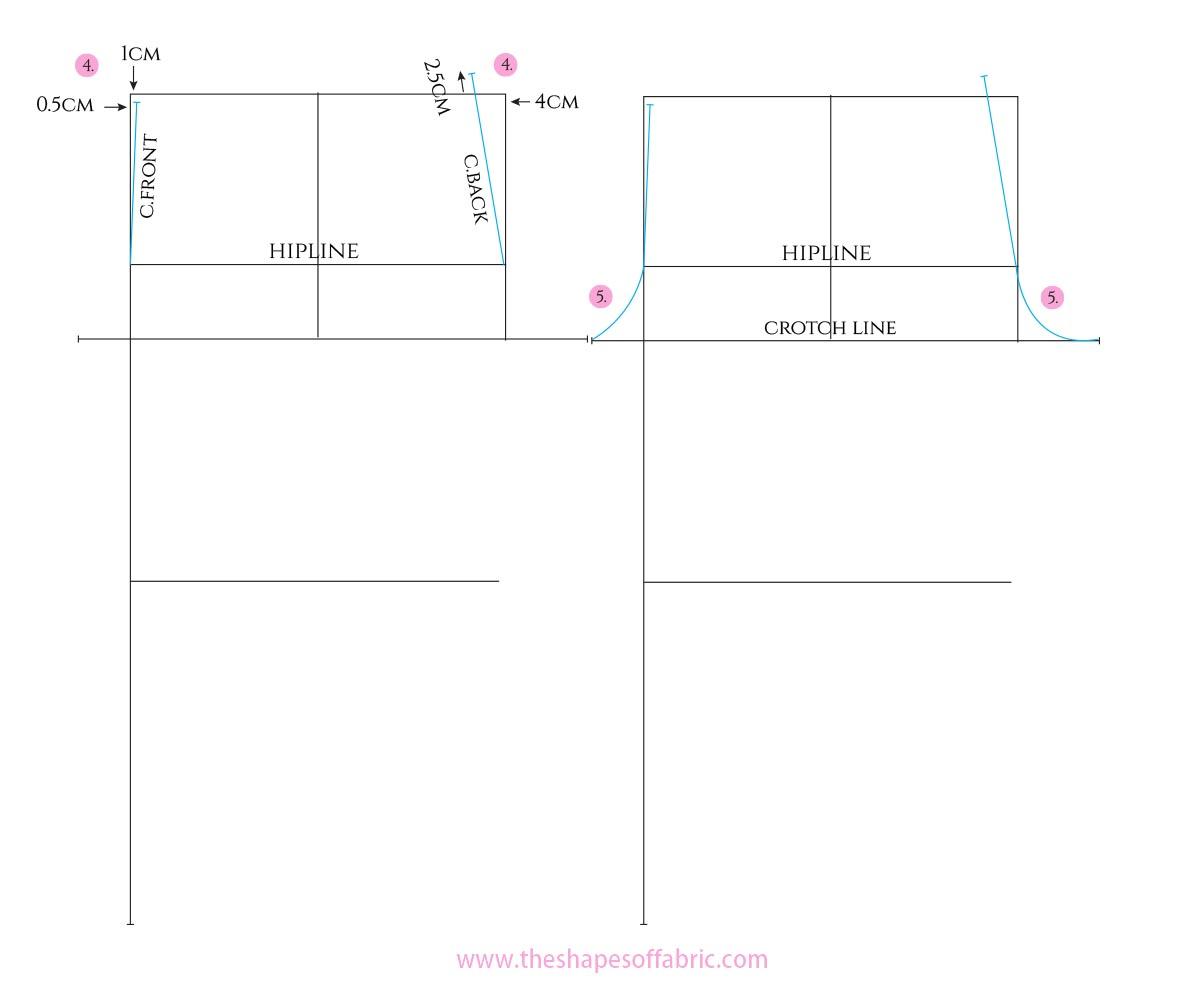
4. Measure 0.5cm inward at the upper left corner and square down 1cm. Unite this point to the hipline to create the c.front line of the pants.
Measure 4cm inward at the upper right corner. Draw a line from the hipline to this point, and continue 2.5cm upwards, as shown in the picture. This is the c.back line.
5. Continue the c.front and c.back lines down by adding the crotch curve. The front should be only slightly curved, whereas the back crotch curve should be deeper.
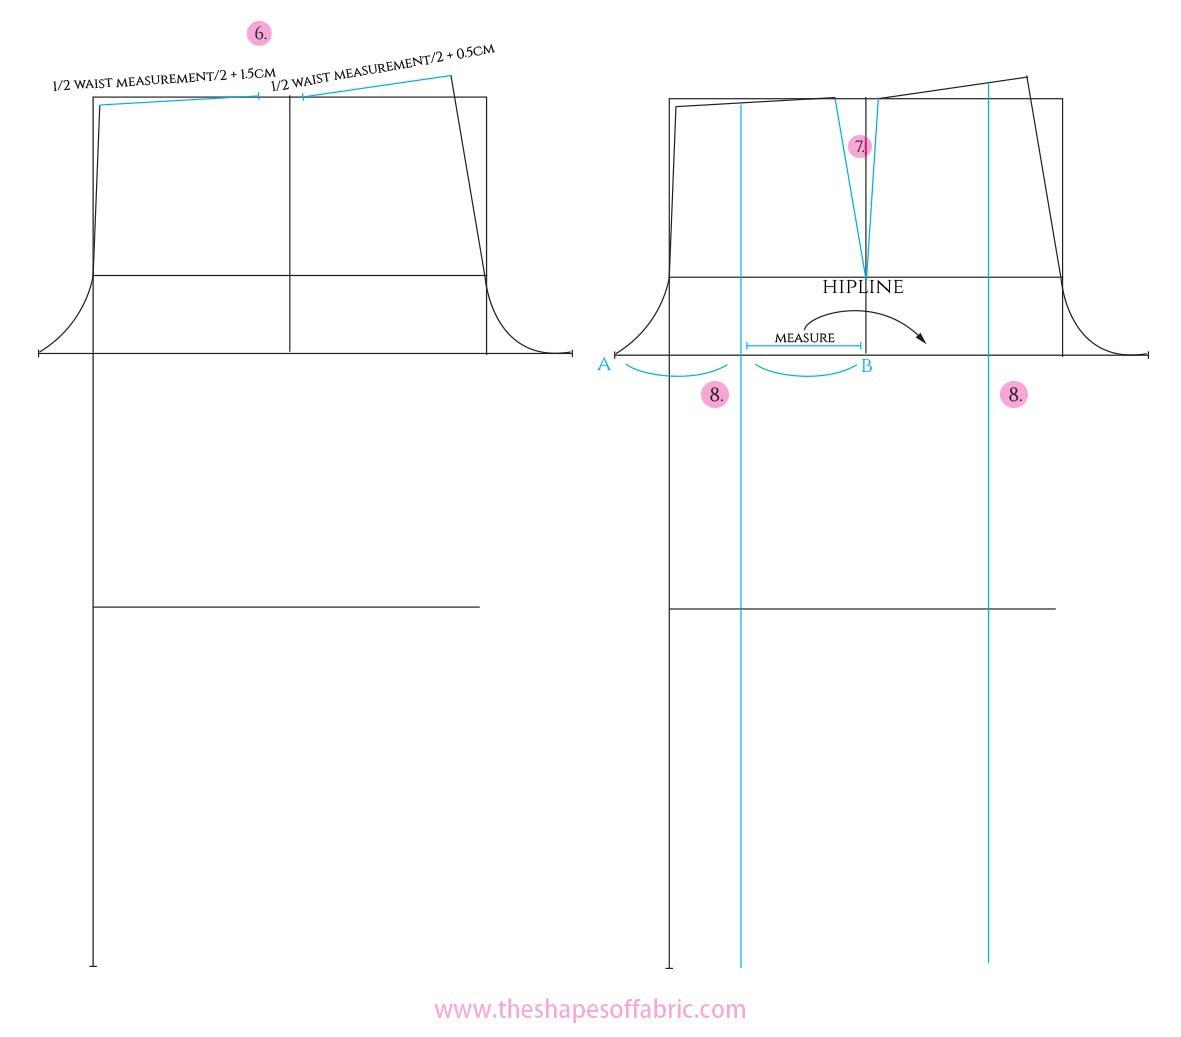
6. Now you can draw the waistline: calculate ½ waist measurement/2 + 1.5cm for the front, and ½ waist measurement/2 + 0.5cm for the back.
For example: 37cm/2 = 18.5cm +1.5cm = 20cm (front) and 37cm/2 = 18.5cm + 0.5cm = 19cm (back).
These measurements take into account a 2cm wide dart that will be placed at the back. The front waistline is slightly wider than the back.
Both waistlines end along the horizontal line you draw in the beginning. The waistline is higher at c.back as you need some extra length for sitting down.
7. Unite the waistline to the hipline with a straight line, both front and back. We’ll draw the hip curve later.
8. You know how classic pants have a crease in the middle of the leg? Well, that is called the crease line. It’s also the grainline of the pants.
To find out where it is, measure the distance between points A and B along the crotchline of the front piece, and divide it in half. Square up and down to complete the crease line/grainline.
Then measure the distance between the side seam and the crease line of the front piece, and use the same measurement for the back piece.
9. Next, let’s draw the hemline of the pants. The front side is slightly smaller than the back, because the calf needs more space. So decide on the hemline circumference and divide it in two.
In this example, for size M pants, the total circumference is 46cm (for reference). So, divided in two, it’s 23cm.
For the front, detract 1cm. For the back, add 1cm. Mark the hemline width evenly on both sides of the grainline.
Here, the front hemline is 22cm, 11cm on both sides of the grainline. The back hemline is 24cm, 12cm on both sides of the grainline.
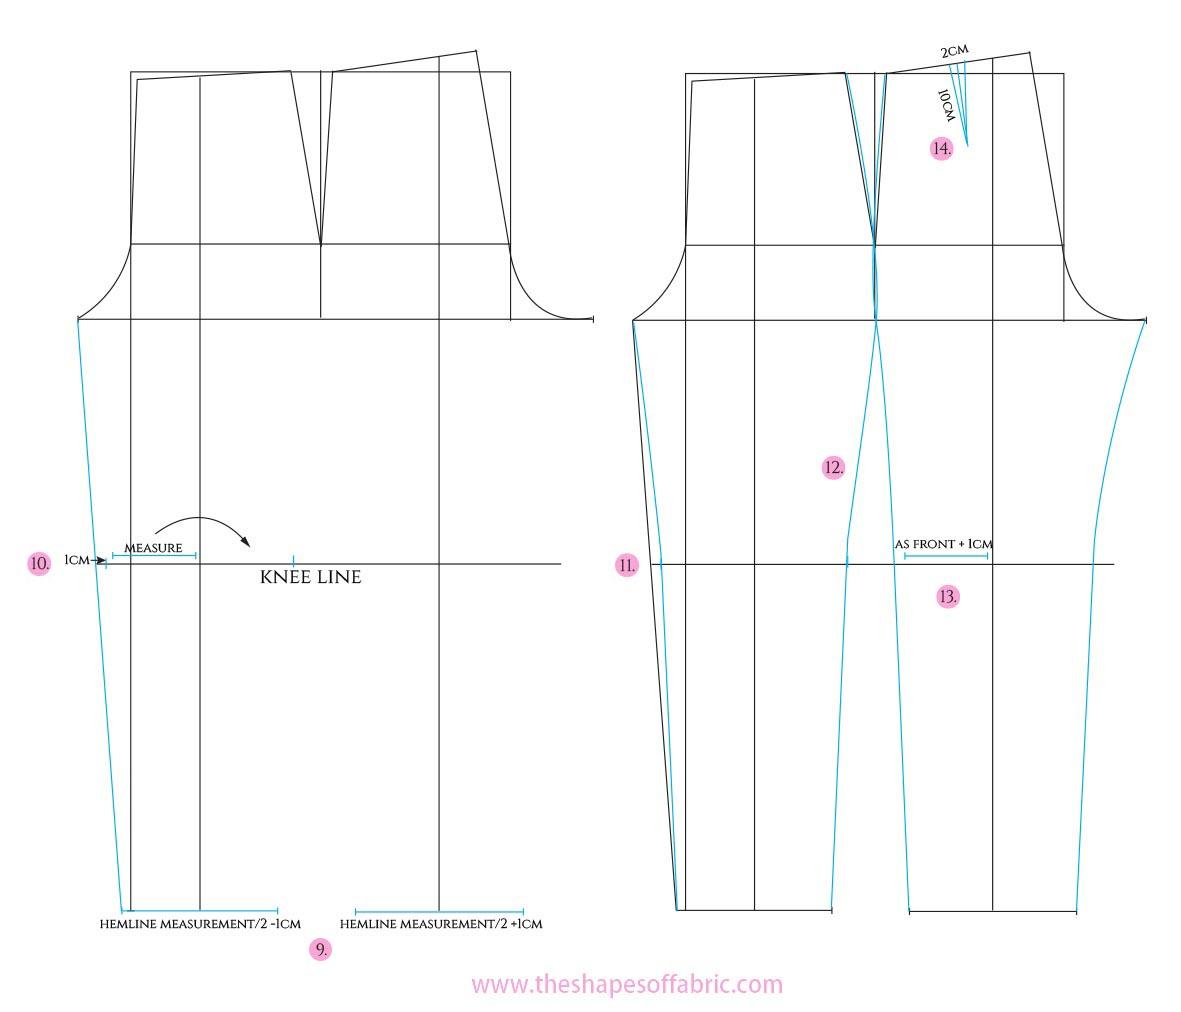
10. Starting from the inseam of the front piece, first unite the hemline to the crotch point with a straight line. Then enter 1cm at the knee level and mark the point. Measure the distance between this point and the grainline along the kneeline to get a guide mark for the side seam, too. (The pant leg sides are identical between the ankle and the knee.)
11. Draw the final inseam of the front piece: draw a straight line from ankle to knee level and then a slightly inward curved line to complete the inseam at the crotch point.
12. As for the side seam, draw again a straight line from ankle to knee level, and then continue with a slightly curved line as shown in the picture; first an inward curve, then outward. You should get a smooth line that continues all the way to the crotch level, and then you can complete the side seam by adding a slight hip curve.
13. Now, use the kneeline measurement of the front piece again. Just add 1cm and sign guide marks on both sides of the grainline at the knee level of the back piece.
Complete the inseam and the side seam of the back piece the same way as you did with the front piece. The inseam can now be more curved.
14. Add a 10cm long, 2cm wide dart in the middle of the back waist.
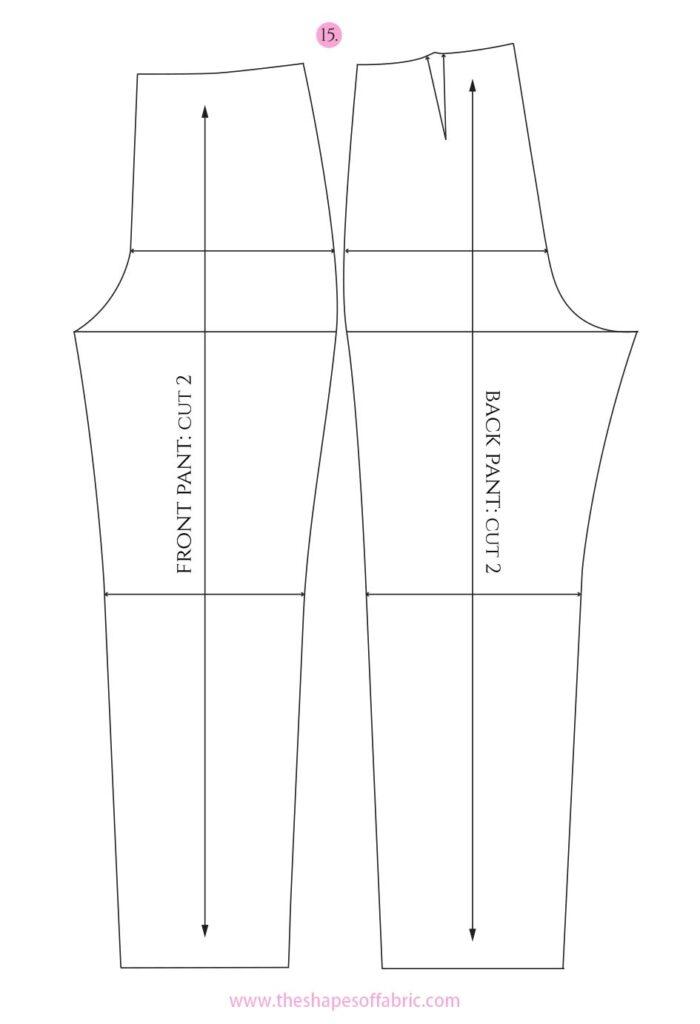
15. Finally, draft the waistline curves. The waistline should start in a right-angle both at the c.front and c.back.
Checking the Basic Pants Pattern
Copy the two pattern pieces and check that the side seams and the inseams are the same length both front and back:
Place the pattern pieces one on top of the other, right sides together and first ”walk” the inseams from the kneeline to the hemline and then from the kneeline to the crotch point and equalize the lines so that the hemline and crotchline run smoothly between the front and back pieces. It’s OK if doing so causes you to lower the back crotch curve slightly. The back inseam is more curved, so it’s likely that it’s also longer than the front inseam.
Then ”walk” the side seams, first from the kneeline to the hemline and then from the kneeline to the waistline and equalize the lines so that the hemline and waistline run smoothly between the front and back pieces.
You can make a straight waistband for your pants. The pattern piece is a rectangle where the width is twice the waistband height (max. 3 + 3cm) and the length is ½ waist circumference. Mark the side seam position with a notch.
Make a toile to check the fit and then correct your pants block accordingly. After this, it’s ready to be used!
I have a Patternmaking Guide on Women’s Pants, when you feel ready to test your pants block in action.

