 Rolex Sea-Dweller 126603 Bi Colour
 I have received lots of requests for a basic bodice pattern tutorial. It took me a while to finish this, because I didn’t want to copy any existing methods directly from a book.
Instead, I made my own version, mixing a few different methods. That of course meant testing a bunch of them to see what would work the best. The idea was to create the most simple pattern I possibly could without that affecting the result. It doesn’t mean this is an easy pattern, especially for beginners.
I know drafting the basic pattern blocks can be difficult and the bodice with darts isn’t the easiest among them. But once you have your very own made-to-measure basic bodice pattern, the reward is that you can turn it into a variety of different tops, shirts and dresses! And that is the fun part.
Update: Now there’s also a video version of this tutorial where I show you how to draft the pattern! Scroll to the end to signup and I’ll send you the links.
If you feel like you’re not ready for the bodice yet, why not start with the basic skirt pattern. For an easier, dartless bodice block, you’ll find instructions here.
I’ve also published a multi-size basic bodice block that you can purchase here. You only need to choose a size closest to your measurements, make a toile, and adapt the pattern. If you prefer to go that route.
Anyways.. where were we.? I used only the Metric system to create this tutorial, because I’m not very familiar with inches and not sure how precise the conversions would result. Hope that’s not a problem.
The Measurements Needed
These are the measurements you will need to draft the basic bodice pattern. As a reference I used the industrial size M. The horizontal measurements here are already divided in half.
If you don’t have your own measurement chart yet, you can get the link to download it by filling the sign up -form at the side panel (or at the bottom, in case of mobile version).
Basic Bodice pattern: starting point
Let’s start the pattern by drafting this rectangle here.
The height is your back waist/nape to waist length+ 2 cm.
The width is ½ bust circumference + 4 cm of ease. Instead of 4, you can also add just 2 cm of ease to get a more fitted bodice, but it’s easy to modify the pattern afterwards, too. I’ll keep both alternatives throughout the tutorial in any case.
Separate the little rectangle at the upper right corner.
The height is 2cm.
For the width, choose your measurement among these:
- Size XS: 6,5cm
- S: 7cm
- M: 7cm
- L: 7,5cm
- XL: 8cm
Then draw the horizontal line in the middle using your armscye depth -measurement + 1,5 cm of ease. If you chose 2 cm of ease earlier, 0,7 cm here is enough. This will be the underarm line.
So for this example: 20cm+1,5cm = 21,5cm.
Mark the side seam position along the underarm line calculating ½ bust circumference /2 + 1,5 cm of ease from the right. (For the smaller amount of ease, add just 0,5 cm here.)
Using the reference measurements, the calculation would be: 46cm /2 =23cm + 1,5cm= 24,5cm.
You can also see 2 vertical lines on both sides. For the back side calculate ½ back width + 1,5 cm (or 0,7 cm) of ease.
For example 18cm +1,5cm = 19,5cm.
When it comes to the front side we also need to add 2 cm because of the bust dart. There’s an asterisk as this value depends on your bust dart width. But more on that later.
So ½ chest width + 2cm + 1,5cm (0,7 cm) of ease: 17cm +2cm +1,5cm = 20,5cm.
Bodice Pattern: Back piece
Now that we have the first part drafted, we can start filling in the details. The back-side first. I added numbers so it’s easier to understand which area I’m talking about.
Neckline, Shoulder slope, Armscye, Hipline
1. Draw the neckline. At least the first 3cm from the c.back should be a completely straight line and then you can curve.
2. Measure 4,5cm from the top and draw a short parallel line. This will be the guideline for the shoulder slope. Then calculate your shoulder width + 1,5cm for the dart and draw a line starting from the base of neck and ending on the guideline you drew earlier.
3. Add a dart in the middle of the shoulder line. The length is 8 cm and width 1,5 cm.
4. To draft the armscye, first measure 5 cm upwards from the underarm line (=point A) And then mark point B in the middle of the shoulder tip and point A. These are your guide marks for the armscye and at the same time will be useful tacks later for a sleeve.
The armscye line should touch the point B, but stay a couple of mm outside of point A. Don’t curve too much.
5. At this point we can also add the hipline. So check your measurement chart for the distance between waist and hip.
Waist and Hip
Next up, the lower part of the back piece. Here you see some variation in the dart width and amount of ease. The idea is that you must balance the numbers depending on your own measurements.
If you don’t have much difference between your bust- and waist measurement, the dart needs to be smaller. Otherwise your side seam doesn’t have any curve. If needed, you could even reduce the amount of ease a bit.
On the other hand, if you have a really small waist or large bust, the side seam curve could be too steep unless you increase the dart width. You could even take in the back seam at the waistline.
1. Mark the side seam along the waistline calculating ½ waist circumference /2 + dart width + 1,5cm (0,5cm) ease.
For this example I chose 2,5cm dart. So the calculation would be: 37cm /2 = 18,5cm + 2,5cm + 1,5cm = 22,5cm.
2. To find the location for the dart, first measure the center point between the side- and back seam at the waistline, and then move 1 cm towards the backseam. We already talked about the dart width, but as for the length, the dart ends 2 cm below the underarm line and 1 cm above the hipline.
3. Mark the side seam along the hipline calculating ½ hip circumference /2 + 1-1,5cm of ease (0,5cm for a more fitted bodice). Here again, you can adjust the amount of ease depending on your measurements.
For example 48cm / 2= 24cm + 1,5cm = 25,5cm.
Finally draw the side seam with the help of the two reference points, adding some curve to the waist and hip without exaggerating.
Bodice Pattern: Front piece
Now that the back piece is ready we can draft the front piece.
Neckline, Bust Dart
1. Starting from the neckline. You can get the A-B distance from the back piece. Remember the little rectangle you drafted in the beginning..? The front neckline width is the same.
Add 1 cm to that to get the missing measurement from point A downwards. Now you can draw the front neckline.
2. Then we can tackle the bust dart. First mark point C. You can get the B-C measurement, too, from the back piece: it’s the distance between the base of neck and the little dart. The idea here is to have the two darts (front and back) match at the shoulder line.
Measure the bust level from point A downwards. Mark it at the c. front and then measure ½ distance between bustpoints to get the starting point for the bust dart. Unite it with point C.
Measure 7,5 cm from bust point upwards along the dart leg, then 2 cm* in a 90 degree angle and mark the point.
* Depending on the difference between bust- and above the bust -measurements. If there is very little difference, you can reduce the value a couple of millimeters. In the opposite case, you might want to increase. The maximum amount I’ve ever had to increase has been 5 mm.
Draw the other dart leg from the bust point, passing through the previous guide mark.
3. Measure 6,5 cm downwards from the top and draw a short parallel line.
Shoulder slope, Armscye, Waist, Hip
1. Close the bust dart by cutting open the little bit between c.front and bust point as in the picture.
Draw the shoulder slope with the dart closed using your shoulder width -measurement. It ends at the horizontal line you drafted previously. Then open the dart again and tape the bit you cut open.
2. To draw the armscye, let’s first add a guide mark 5 cm upwards from the underarm line. The front armscye line should touch this point. You can curve it more than the back armscye at the underarm region. Make a nice continuous line from front to back.
3. Draw a line from the bust point all the way down.
Measure the front waist length from point A downwards and draw a horizontal line that crosses with the one you just drew.
Measure ½ waist circumference + dart width + 2,5 cm (1,5 cm) ease to mark the side seam along the waistline. Here the rules are the same as with the back piece: find the dart width that best suits your measurements.
In my example 37cm /2 = 18,5cm + 3cm + 2,5cm = 24cm
The widest point of the waist dart should be at the front waist level. The dart starts 2 cm below the bust point and ends at hipline.
4. Measure ½ hip circumference + 1-2,5 cm (1,5 cm) of ease depending on your measurements.
For example 48cm /2 = 24cm + 2,5cm = 26,5cm.
Finally, draw the side seam respecting the two reference points and curving the line slightly at the waist and hip.
The Basic Bodice Block is Ready
Here is the end result using the size M measurements. Bare in mind that these are so called ideal measurements, so don’t worry if your pattern looks different.
Bodice Sleeve Pattern
The bodice will also need a sleeve that goes with it. We’ll get most of the measurements directly from the bodice.
Other measurements: the total sleeve length and the elbow level. It’s also good to have the upper arm circumference.
Here’s a picture of the bodice with the areas to measure.
The Sleeve Cap
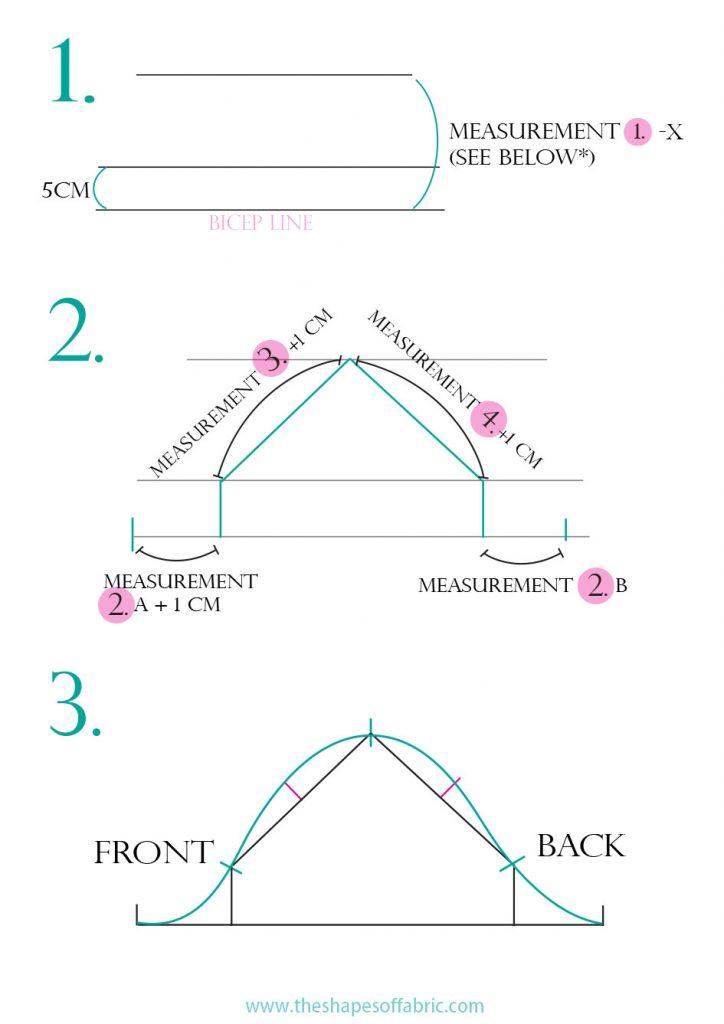
1. Start the pattern by drawing these 3 horizontal lines. The first two are 5 cm apart from each other. To draw the uppermost line, measure the distance between the underarm line and the shoulder tip of your bodice back (1) with a straight line. *Detract the following cm (=x) from the measurement :
- Size XS: 3,5 cm
- S: 3,5 cm
- M: 3,5 cm
- L: 4 cm
- XL: 4cm
For example, my bodice size is M, so I’d detract 3,5 cm.
2. Then mark the starting point for the sleeve cap along the future bicep line. Measure the bit 2A from the bodice and add 1 cm. From that point, draw a vertical line straight up to the second horizontal line.
The next measurement is that between the armhole notch and the shoulder point of the bodice front (3), measured in a straight line. Add 1 cm of ease.
Draw a slanted line using this measurement ending on the uppermost guideline.
Then do the same with the bodice back (4). This time the line goes in the other direction and ends on the second guideline.
Draw a vertical line straight down from that point. Then measure the bit 2B from the bodice and mark the end point of the sleeve along the bicep line.
3. Now we have this house-shaped sleeve cap. Mark the middle point along the two slanted lines (=reference points). Then draw your sleeve cap as in the picture.
The front armhole line should start with a more pronounced curve on the bicep line.
Use the reference points to shape the upper part of the sleeve cap; at these points, the curve should be at its maximum, about 1,5-2cm away from the slanted line. The front side is usually more round than the back side.
Notice where I placed the sleeve armhole notches: 5 cm above the bicep line, just like the bodice has its armhole notches 5 cm above the underarm line.
Sleeve Cap -check
Compare the measurements of the sleeve cap and the armscye lines of the bodice, on both sides of the armhole notches. The basic sleeve has about 10% of ease between the cap notch and the armhole notch, both front and back. Meaning the sleeve cap is bigger than the armhole of the bodice.
So measure the armscye line length of the bodice between the armhole notch and the shoulder tip, and add 10% to get the measurement needed for the sleeve cap. For example if the measurement is 13cm, the ease would be 1,3cm and as a result, the sleeve cap should measure 14,3cm.
If you’re not happy with the measurements, try to adjust the sleeve cap shape. You can modify the cap width and -height. And also move the cap notch a bit to left or right if you need to distribute the ease.
The remaining part of the sleeve cap, after the armhole notch, should have the same measurement as the bodice. You can adjust the sleeve size if needed.
Finally, measure the bicep line length and compare it to your upper arm circumference to see if the sleeve will be wide enough at that point.
Rest of the Sleeve
When you’ve controlled and adjusted the sleeve cap, mark the middle of the bicep line and draw a line straight down from that point. This will be the grainline of your sleeve pattern. It doesn’t always coincide with the cap notch btw.
Measure the total length of your sleeve starting from the top of the sleeve cap and choose the hemline width. It could be for example 26 cm. So divide 13 cm on both sides of the centre line. Then draw the underseams and finally the elbow line.
Final Touches and Toile
Now you’re supposed to copy the pattern. Never cut the original. Check all the lines. They should continue smoothly between the front- and back pieces. The waistlines should match. Close the little shoulder dart at the back, re-draw the shoulderline and cut. Check that the two darts match at the shoulderline.
Make a toile to check the fit so you can make corrections to your original pattern. Besides the general fit all around, you will want to check for example the shoulder seam position and if you managed to get the bust points right.
Check the fit of the sleeves: do they feel too tight, can you move your arms back and forth without the fabric pulling? How’s the length?
Once you’re happy with the result, the basic bodice pattern is ready for use. Let me know if you encountered problems and if there’s something that isn’t clear.
Here you can sign up to receive links to a video version of this tutorial and a summary on the basic bodice pattern construction. If you are already on my mailing list, you can download the summary from the resource library.
Related Posts
Updated 8.12.19: added the sleeve.